Today I got asked how to modify the search box on a MOSS site so that it displayed "People" by default in stead of "All Sites". The customer already figured out a way to do this with code, but they weren't 100% sure about it. I had to search for this myself too, cause to be honest, I hadn't done this before, even though I'm already working with SharePoint for almost 3 years now... That's why I'm making this short post, so that all the other people who are trying to do this, know how easy it really is.
To modify the default scope, go to your home page and navigate to "Site Actions” --> “Site Settings” --> “Modify All Site Settings". On this page, pick "Search scopes" under the Site Collection Administration. Here you'll see some different "Display groups", one of them is the "Search Dropdown", which is the search box you see on your SharePoint site. If you click on the "Search Dropdown" link, you'll be taken to a page with some settings for this group and the bottom one is where you set your default scope. So modify this to whatever you want, click OK and you're done!
Thursday, December 31, 2009


Workflow fails to start when associated to a survey list in WSS 3.0
The status of a workflow appears as "Failed to Start" when you try to start a workflow from a survey response in Windows SharePoint Services 3.0
Refer this knowledge base article. It seems to be a known issue at MS - http://support.microsoft.com/kb/926370
How to edit list forms like NewForm.aspx, EditForm.aspx and DispForm.aspx in MOSS?
Most common question among SharePoint customization is that
If we need to edit New/Edit/Display Form of list most of the time we are using SharePoint designer.
But here is the one nice trick to achieve this functionality.
Just add “&ToolPaneView=2” at the end of the URL and refresh the page.
So that you’re URL will be like this.
You can see add webpart tool pan beside this web part.
And that will take you to this type of page.
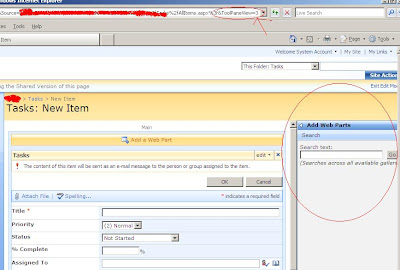
This will allow you to search webpart across all available galleries
Cheers once again...
“Why Edit Page option is not available in list forms like NewForm.aspx, EditForm.aspx and DispForm.aspx?”
If we need to edit New/Edit/Display Form of list most of the time we are using SharePoint designer.
But here is the one nice trick to achieve this functionality.
Just add “&ToolPaneView=2” at the end of the URL and refresh the page.
So that you’re URL will be like this.
http://yourMOSSserver/... /Lists/Demo/NewForm.aspx?RootFolder...&Source=…&ToolPaneView=2
http://yourMOSSserver/... /Lists/Demo/EditForm.aspx?RootFolder...&Source=…&ToolPaneView=2
http://yourMOSSserver/... /Lists/Demo/DispForm.aspx?RootFolder...&Source=…&ToolPaneView=2
You can see add webpart tool pan beside this web part.

Just add or remove your webpart and your work is done.
cheers
Below contents are Update as on 22/07/08
There is one more parameter with the same name just pass the value 3 with that.
So that you’re URL will be like this.
http://yourMOSSserver/... /Lists/Demo/NewForm.aspx?RootFolder...&Source=…&ToolPaneView=3
And that will take you to this type of page.

This will allow you to search webpart across all available galleries
Cheers once again...
Wednesday, December 30, 2009
Limiting the number of survey responses
Hi All,
In this article, I am going to share one very important aspect of survey. Many times we require limiting number of responses from survey. However SharePoint does not provide us with the facility to limit the number of responses.
Ok, then how to achieve this? Here we go, follow these simple steps and you are good to go.
(1) Write one web part and write one code which checks for the total responses for specific survey. Add this web part on NewForm.aspx and overview.aspx, all responses and graphical summary of the survey. You get NewForm.aspx when you click on respond to the survey button.
(2) Write down simple code, check URL, if NewForm word exist, then just count the total number of item in survey and if it exceeds let’s say 30 responses, and then redirect back to Source parameter.
(3) If in URL overview, allitems or summary exist, just count the total number of item in survey and if it exceeds let’s say 30 responses then write a statement saying you are not allowed to respond because it has already reached to the maximum responses.
Your job is done.
In this article, I am going to share one very important aspect of survey. Many times we require limiting number of responses from survey. However SharePoint does not provide us with the facility to limit the number of responses.
Ok, then how to achieve this? Here we go, follow these simple steps and you are good to go.
(1) Write one web part and write one code which checks for the total responses for specific survey. Add this web part on NewForm.aspx and overview.aspx, all responses and graphical summary of the survey. You get NewForm.aspx when you click on respond to the survey button.
(2) Write down simple code, check URL, if NewForm word exist, then just count the total number of item in survey and if it exceeds let’s say 30 responses, and then redirect back to Source parameter.
(3) If in URL overview, allitems or summary exist, just count the total number of item in survey and if it exceeds let’s say 30 responses then write a statement saying you are not allowed to respond because it has already reached to the maximum responses.
Your job is done.
Time Spanning the "!New" Indicator in Sharepoint 2007
Here we are explaining a way, how to change “!New” indicator time span.
Below is the command to change the time of “!New” label of SharePoint Item
stsadm.exe -o setproperty -pn days-to-show-new-icon -pv <> -url [Your Virtual Server's URL]
To turn off the “!New” icon, set the number of days to zero
Here is the MSDN KB link for the same.
The change is for ALL list items (not just documents) on the virtual server
Good thing is it does not required IISRESET
Coloring Events on a Sharepoint Calendar
Hi All,
We all are familiar with coloring events in Outlook calendar. Question is can we have the same deal with SharePoint calendar and the answer is yes we can have. In this article, I am going to share few tips on how to achieve this functionality.
To achieve this, first create one field in Calendar list. For example, give it a name “Category”. Your each event is divided in some category. Give it as choice column and enter following categories for selection choice.
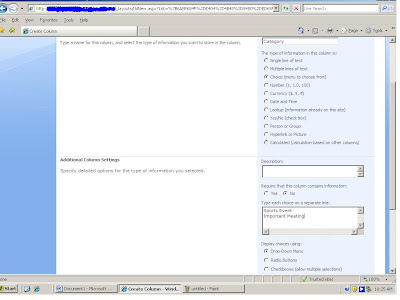
So, your each event is divided in these two categories. So now, go ahead and add two entries in calendar. One of Sports and other is of important meeting category.
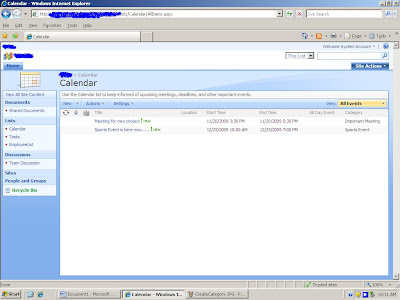
Also create one more calculated column called “CatTitle”
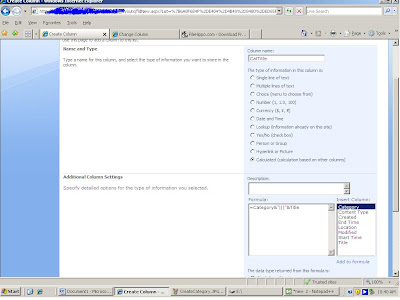
And change the calendar view to this
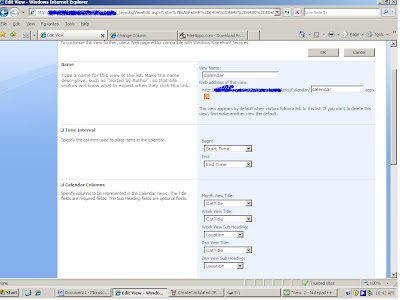
And now we will add one content editor web part below calendar web part. So Edit the page and add one content editor web part and add the following line of code. This will color the different events.
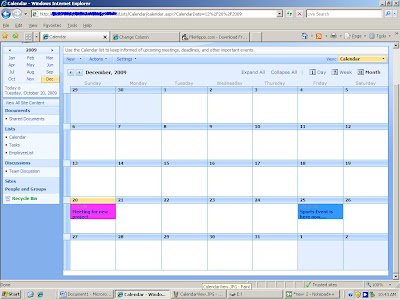
I would like to thank Mark Wilson for this wonderful trick.
That's it. your job is done.
We all are familiar with coloring events in Outlook calendar. Question is can we have the same deal with SharePoint calendar and the answer is yes we can have. In this article, I am going to share few tips on how to achieve this functionality.
To achieve this, first create one field in Calendar list. For example, give it a name “Category”. Your each event is divided in some category. Give it as choice column and enter following categories for selection choice.

So, your each event is divided in these two categories. So now, go ahead and add two entries in calendar. One of Sports and other is of important meeting category.

Also create one more calculated column called “CatTitle”

And change the calendar view to this

And now we will add one content editor web part below calendar web part. So Edit the page and add one content editor web part and add the following line of code. This will color the different events.

I would like to thank Mark Wilson for this wonderful trick.
That's it. your job is done.
Thursday, December 3, 2009
Windows SharePoint Services (WSS 3.0) Search Error Fix
Event Type: Warning
Event Source: Windows SharePoint Services 3 Search
Event Category: Gatherer
Event ID: 2436
Date: 2/25/2009 Time: 12:35:04 PM
User: N/AComputer: YOURMOSSSERVER
Description:
The start address cannot be crawled.
Context: Application 'Search index file on the search server', Catalog 'Search'
Details: Access is denied. Check that the Default Content Access Account has access to this content, or add a crawl rule to crawl this content. (0x80041205)
For more information, see Help and Support Center at http://go.microsoft.com/fwlink/events.asp.
Resolution:
Follow these steps to Disable the loopback check which is causing the error:
Click Start, click Run, type regedit, and then click OK. In Registry Editor, locate and then click the following registry key: HKEY_LOCAL_MACHINE\SYSTEM\CurrentControlSet\Control\Lsa
Right-click Lsa, point to New, and then click DWORD Value. Type DisableLoopbackCheck, and then press ENTER.
Right-click DisableLoopbackCheck, and then click Modify.
In the Value data box, type 1, and then click OK.
Quit Registry Editor, and then restart your computer.
See the following knowledge base article from Microsoft for full details on the error and another possible resolution: http://support.microsoft.com/kb/896861
Event Source: Windows SharePoint Services 3 Search
Event Category: Gatherer
Event ID: 2436
Date: 2/25/2009 Time: 12:35:04 PM
User: N/AComputer: YOURMOSSSERVER
Description:
The start address cannot be crawled.
Context: Application 'Search index file on the search server', Catalog 'Search'
Details: Access is denied. Check that the Default Content Access Account has access to this content, or add a crawl rule to crawl this content. (0x80041205)
For more information, see Help and Support Center at http://go.microsoft.com/fwlink/events.asp.
Resolution:
Follow these steps to Disable the loopback check which is causing the error:
Click Start, click Run, type regedit, and then click OK. In Registry Editor, locate and then click the following registry key: HKEY_LOCAL_MACHINE\SYSTEM\CurrentControlSet\Control\Lsa
Right-click Lsa, point to New, and then click DWORD Value. Type DisableLoopbackCheck, and then press ENTER.
Right-click DisableLoopbackCheck, and then click Modify.
In the Value data box, type 1, and then click OK.
Quit Registry Editor, and then restart your computer.
See the following knowledge base article from Microsoft for full details on the error and another possible resolution: http://support.microsoft.com/kb/896861
SharePoint V3: Stsadm.exe Simple Backup Script
Create Backups Directory
Create a backup directory for storing the scheduled SharePoint backups (e.g. c:\backupsharepoint)
Create Bat File Directory
Create a directory for storing the backup script file (e.g. c:\scriptssharepoint)
Create Bat File
Create a bat file using the code below, modified for your environment. Use UNC paths when using in a server farm environment.
@echo offecho ====================================================
echo Backup Script For Office SharePoint Server 2007
echo ====================================================
cd \program files\common files\microsoft shared\web server extensions\12\bin
@echo off
stsadm.exe -o backup -url http://servername/ -filename c:\backupssharepoint\backupsharepoint.dat -overwrite
@echo off
echo completed
Schedule bat fileSchedule the backup to run frequently, during off peak hours.
Open Start > Programs > Accessories > System Tools > Scheduled TasksAdd a Scheduled Task
Scheduled Task Welcome Screen, Click NextClick the program you want Windows to run, Click Browse
Select the backupsharepoint.bat file you created (e.g. c:\scriptssharepoint\backupsharepoint.bat)
Name the task, Schedule it (e.g. Daily)
Start Time, Frequency, Start Date
Username and Password (use a domain user account that has proper permissions and non expiring password )
Finish
Verify Backups
Keep the backup directory secure. Monitor the job to ensure the job is running properly. Perform test restores from the backup files.
Create a backup directory for storing the scheduled SharePoint backups (e.g. c:\backupsharepoint)
Create Bat File Directory
Create a directory for storing the backup script file (e.g. c:\scriptssharepoint)
Create Bat File
Create a bat file using the code below, modified for your environment. Use UNC paths when using in a server farm environment.
@echo offecho ====================================================
echo Backup Script For Office SharePoint Server 2007
echo ====================================================
cd \program files\common files\microsoft shared\web server extensions\12\bin
@echo off
stsadm.exe -o backup -url http://servername/ -filename c:\backupssharepoint\backupsharepoint.dat -overwrite
@echo off
echo completed
Schedule bat fileSchedule the backup to run frequently, during off peak hours.
Open Start > Programs > Accessories > System Tools > Scheduled TasksAdd a Scheduled Task
Scheduled Task Welcome Screen, Click NextClick the program you want Windows to run, Click Browse
Select the backupsharepoint.bat file you created (e.g. c:\scriptssharepoint\backupsharepoint.bat)
Name the task, Schedule it (e.g. Daily)
Start Time, Frequency, Start Date
Username and Password (use a domain user account that has proper permissions and non expiring password )
Finish
Verify Backups
Keep the backup directory secure. Monitor the job to ensure the job is running properly. Perform test restores from the backup files.
Saturday, April 25, 2009
Lil Tidbits of My Life!!!
Ah! Honestly, people, it takes a lot of effort to make myself write. But the problem is I am not able to stop myself once I get into it. So what am I thinking about today?
I read a beautiful line somewhere. “Never take life too seriously. Nobody comes out of it alive anyway!” So you see, we spend our entire lives dodging the inevitable but one fine day you finally face the thing that has been chasing you since the day you were born and then you are free to sleep without any interruption from the mobile alarm (2 mobiles if you are on IT support) or your maidservant or doodhwala. Well, I have successfully dodged the inevitable for another year in this lifetime. Also, this happens to be a very special year because I will be completing three years over a quarter of a century and I expect to achieve the quarter feat at least three more times.
But then this makes me think about my life so far. Has it been good? Have I done any justice to it? Have I been a good son(umm…interesting question!), a good brother(well, this is the best I could be to her), a good friend (no comments!), a good hubby(Umm ... well ... trying to), a good student (definitely not!), a good professional (hehe..you gotta be kidding)?
Okay! It all started when I troubled my mom for the first time by disturbing her sleep on a reasonably cold night. March(s) are pretty warm in Bagalkot, a remote town in Northern Karnataka, at least they used to be a quarter century back. I have mentioned in my earlier posts that I am a lazy person and I was too lazy to even to be born. My parents were waiting for me for a complete week. They thought that I would remain in my mom’s womb for the rest of my life. But I finally decided to open my eyes to this beautiful world. I am told that my dad was in tears when he saw me for the first time. I hope it was because of euphoria and not because of a rude shock! :-D Well there are many legends surrounding my birth. One being my dad was in tears, another one being I used to look like a chipkali (many believe I still do!) and the most sensational and popular one being that I was picked up from a naali. :- Why do all the parents in this world have to crack that pathetic joke! I will never do it to my kids (or maybe I would. it is a nice way to annoy them! :-D).
And since then it has been a journey. Sometimes I had company, at other times I was alone. Sometimes I wished I had company, at other times I wished I were left alone. Some people made my life look ordinary; some others made mine extra ordinary. There were moments when the entire world seemed to be at my feet; and then there were moments when I was brought down to my feet. There were days when I could relax (the entire semester would be time to relax and idle) and then there were those that made me work like a donkey (it happens a lot in IT). There have been people who trusted me and then there were those who broke my faith. Some were funny; some made me look funny. It has indeed been a mixed bag and maybe that is how life should be. Of all the good and bad things that have happened, I think this life has been worth living for. :-)
After living for such a long time, I still don’t know what is that one thing that is waiting for me. I still don’t know what I want to be, where I want to be. Recently a friend questioned on his blog – how many of us start with a single most aim and work towards it till the end? Well, there might be some who do, but I do not fall in that category. I achieved some unexpected things at times and failed miserably at others. But did I learn my lessons? Umm.. I think yes. I might be adamant at times to accept and follow them, but I have learnt them, definitely. My life has followed the path in the following lines..
"Apni marzi se kahan apne safar ke hum hain…
Rukh hawaaon ka jidhar ka hai, udhar ke hum hain.."
I have no regrets, though, I would try not to make the same mistakes again. And life has been kind to me to give me some important support systems throughout – my parents, my sister, my darling wife and some extremely good friends.
And special mention about three very special people who have taught me the ways of living. I would have been a very different person without these three and I want to say THANK YOU. One will definitely read this and the other two most probably will not!
Tuesday, October 14, 2008
SharePoint ServerTemplate values
Thanks to Evan Grimmett for this list:
- 100 Generic list
- 101 Document library
- 102 Survey
- 103 Links list
- 104 Announcements list
- 105 Contacts list
- 106 Events list
- 107 Tasks list
- 108 Discussion board
- 109 Picture library
- 110 Data sources
- 111 Site template gallery
- 112 User Information list
- 113 Web Part gallery
- 114 List template gallery
- 115 XML Form library
- 116 Master pages gallery
- 117 No-Code Workflows
- 118 Custom Workflow Process
- 119 Wiki Page library
- 120 Custom grid for a list
- 130 Data Connection library
- 140 Workflow History
- 150 Gantt Tasks list
- 200 Meeting Series list
- 201 Meeting Agenda list
- 202 Meeting Attendees list
- 204 Meeting Decisions list
- 207 Meeting Objectives list
- 210 Meeting text box
- 211 Meeting Things To Bring list
- 212 Meeting Workspace Pages list
- 300 Portal Sites list
- 301 Blog Posts list
- 302 Blog Comments list
- 303 Blog Categories list
- 850 Page Library
- 1100 Issue tracking
- 1200 Administrator tasks list
- 2002 Personal document library
- 2003 Private document library
Sysprepping your Virtual Machine for other developers
Creating a SharePoint Development Environment is a painfull task that usual takes at least a day / day and a half to get right. Once you have installed the OS, Applications, Service Packs, Updates, downloaded and installed your favourite tools, etc the time just goes.
The great thing is that with a Virtual Machine you can just take a copy of that machine and give it to someone else. Great. Although this doesn't really work. If you take a copy of a virtual machine and give it to someone else, they have the same SID, GUIDs and MAC addresses and as soon as you connect them both to the network, Windows has a cow and you are constantly bombarded with notices about another machine on the network with the same name, etc.
There is a great tool out there called Sysprep that allows you to remove these values from the machine and when you give a copy of your .vhd to someone else, the first time they load it up, they are assigned new values and hence, have a unique VM on the network. Brilliant.
This step by step guide was initially found on here by Megan Davies on her Technet Blog
Important Notes:
Do not perform this procedure on the host computer!! Perform it only within the guest operating system of the virtual machine you want to clone.
Microsoft does not support using a tool other than Sysprep for cloning virtual machines. For more information, see this Knowledge Base article: http://support.microsoft.com/Default.aspx?id=162001.
Step 1: Install the Setup Manager files in your guest operating system
Set up a base virtual machine by installing the operating system, service pack, patches, applications, and so forth that you want to clone.
Start the guest operating system and log on as a local administrator.
From the guest operating system, go to the Microsoft Web site and download the appropriate Sysprep version. Extract the files to a folder such as C:\Tools on the guest hard disk. You can obtain the SysPrep files from the following locations:
Windows 2000: http://www.microsoft.com/windows2000/downloads/tools/sysprep/default.asp
Windows XP: http://www.microsoft.com/downloads/details.aspx?FamilyID=7a83123d-507b-4095-9d9d-0a195f7b5f69&DisplayLang=en
Windows XP SP2 and Windows Server 2003: http://www.microsoft.com/downloads/details.aspx?FamilyID=3e90dc91-ac56-4665-949b-beda3080e0f6&displaylang=en&Hash=RWRPDM9
Step 2: Create an answer file
Note: This procedure applies to the Sysprep version for Windows Server 2003. You’ll need to modify the steps for other versions of Sysprep. The files that you extracted from the Microsoft Web site include a help file named Deploy.chm that has specific information for your version. It's a good idea to read the help file and become familiar with this tool and figure out how to customize the following steps for your own environment and purposes.
In the Tools folder on the local disk of the guest operating system, double click Setupmgr.exe to start the Setup Manager wizard.
Click "Next."
Select "Create New" and click "Next."
Select "Sysprep Setup" and click "Next."
Select the type of guest operating system and click "Next."
Select "Yes – Fully automate the installation" and click "Next."
Type a name and organization, click "Next."
Accept the default display settings by clicking "Next."
Select your home time zone and click "Next."
In Product Key type the product key and click "Next."
In licensing, select the type of license for the guest operating system, and click "Next."
Type a computer name for the guest operating system and click "Next."
Set the administrator password and click "Next."
To ensure that the password will be set, the machine’s password must be blank. Press Right-ALT + DEL and click "Change Password." Type the old password and leave the new password blank. Click "OK."
Select "Typical Settings" and click "Next."
Leave the machine in a workgroup and click "Next."
Customize the next few screens of additional settings as necessary. If you don't know what they're for, accept the defaults.
In "Identification String" type the computer name and click "Finish."
Specify C:\Tools\Sysprep\sysprep.inf for the location for the .inf file.
Click "Cancel" to close the Setup Manager wizard.
You now have a C:\sysprep folder with your sysprep file and copy stored at C:\tools\sysprep\sysprep.inf.
Copy Sysprep.exe and Setupcl.exe from C:\Tools\Sysprep to C:\Sysprep.
Step 3 – Sysprep the guest operating system
Close all windows in the guest operating system.
Click "Start" and then "Run."
Type C:\sysprep\sysprep.exe and press Enter.
This starts the Sysprep process. Click "OK" to clear the warning dialog.
Select "Do not reset grace period for activation."
Make sure that the shutdown mode is "Shutdown."
Click "Reseal."
When prompted about regenerating SIDS, click "OK." The guest operating system will be Sysprepd and will automatically shut down.
Remove the base .vhd file from the virtual machine, and in the file system, make the base.vhd file read-only. You need to do this because you do not want to start a virtual machine by using this base .vhd file. If you do, it will undo the whole process that you just went through.
You can now make copies of this .vhd file and attach them to different virtual machines. After you copy the .vhd file, you need to remove the copy’s read-only attribute. When you start a virtual machine with a copied .vhd file, it will receive a unique SID and other identifiers. You can also use the base .vhd file as the parent drive image for several differencing drives. The unique identifiers for each guest operating system built in this way will thus be written into the differencing drives, and not the parent.
Note: The fourth time you run Sysprep on the same media, you receive the message, "Your grace period limit has been reached and will not be reset." For more information, see http://support.microsoft.com/default.aspx?scid=299840.
The great thing is that with a Virtual Machine you can just take a copy of that machine and give it to someone else. Great. Although this doesn't really work. If you take a copy of a virtual machine and give it to someone else, they have the same SID, GUIDs and MAC addresses and as soon as you connect them both to the network, Windows has a cow and you are constantly bombarded with notices about another machine on the network with the same name, etc.
There is a great tool out there called Sysprep that allows you to remove these values from the machine and when you give a copy of your .vhd to someone else, the first time they load it up, they are assigned new values and hence, have a unique VM on the network. Brilliant.
This step by step guide was initially found on here by Megan Davies on her Technet Blog
Important Notes:
Do not perform this procedure on the host computer!! Perform it only within the guest operating system of the virtual machine you want to clone.
Microsoft does not support using a tool other than Sysprep for cloning virtual machines. For more information, see this Knowledge Base article: http://support.microsoft.com/Default.aspx?id=162001.
Step 1: Install the Setup Manager files in your guest operating system
Set up a base virtual machine by installing the operating system, service pack, patches, applications, and so forth that you want to clone.
Start the guest operating system and log on as a local administrator.
From the guest operating system, go to the Microsoft Web site and download the appropriate Sysprep version. Extract the files to a folder such as C:\Tools on the guest hard disk. You can obtain the SysPrep files from the following locations:
Windows 2000: http://www.microsoft.com/windows2000/downloads/tools/sysprep/default.asp
Windows XP: http://www.microsoft.com/downloads/details.aspx?FamilyID=7a83123d-507b-4095-9d9d-0a195f7b5f69&DisplayLang=en
Windows XP SP2 and Windows Server 2003: http://www.microsoft.com/downloads/details.aspx?FamilyID=3e90dc91-ac56-4665-949b-beda3080e0f6&displaylang=en&Hash=RWRPDM9
Step 2: Create an answer file
Note: This procedure applies to the Sysprep version for Windows Server 2003. You’ll need to modify the steps for other versions of Sysprep. The files that you extracted from the Microsoft Web site include a help file named Deploy.chm that has specific information for your version. It's a good idea to read the help file and become familiar with this tool and figure out how to customize the following steps for your own environment and purposes.
In the Tools folder on the local disk of the guest operating system, double click Setupmgr.exe to start the Setup Manager wizard.
Click "Next."
Select "Create New" and click "Next."
Select "Sysprep Setup" and click "Next."
Select the type of guest operating system and click "Next."
Select "Yes – Fully automate the installation" and click "Next."
Type a name and organization, click "Next."
Accept the default display settings by clicking "Next."
Select your home time zone and click "Next."
In Product Key type the product key and click "Next."
In licensing, select the type of license for the guest operating system, and click "Next."
Type a computer name for the guest operating system and click "Next."
Set the administrator password and click "Next."
To ensure that the password will be set, the machine’s password must be blank. Press Right-ALT + DEL and click "Change Password." Type the old password and leave the new password blank. Click "OK."
Select "Typical Settings" and click "Next."
Leave the machine in a workgroup and click "Next."
Customize the next few screens of additional settings as necessary. If you don't know what they're for, accept the defaults.
In "Identification String" type the computer name and click "Finish."
Specify C:\Tools\Sysprep\sysprep.inf for the location for the .inf file.
Click "Cancel" to close the Setup Manager wizard.
You now have a C:\sysprep folder with your sysprep file and copy stored at C:\tools\sysprep\sysprep.inf.
Copy Sysprep.exe and Setupcl.exe from C:\Tools\Sysprep to C:\Sysprep.
Step 3 – Sysprep the guest operating system
Close all windows in the guest operating system.
Click "Start" and then "Run."
Type C:\sysprep\sysprep.exe and press Enter.
This starts the Sysprep process. Click "OK" to clear the warning dialog.
Select "Do not reset grace period for activation."
Make sure that the shutdown mode is "Shutdown."
Click "Reseal."
When prompted about regenerating SIDS, click "OK." The guest operating system will be Sysprepd and will automatically shut down.
Remove the base .vhd file from the virtual machine, and in the file system, make the base.vhd file read-only. You need to do this because you do not want to start a virtual machine by using this base .vhd file. If you do, it will undo the whole process that you just went through.
You can now make copies of this .vhd file and attach them to different virtual machines. After you copy the .vhd file, you need to remove the copy’s read-only attribute. When you start a virtual machine with a copied .vhd file, it will receive a unique SID and other identifiers. You can also use the base .vhd file as the parent drive image for several differencing drives. The unique identifiers for each guest operating system built in this way will thus be written into the differencing drives, and not the parent.
Note: The fourth time you run Sysprep on the same media, you receive the message, "Your grace period limit has been reached and will not be reset." For more information, see http://support.microsoft.com/default.aspx?scid=299840.
Tuesday, August 5, 2008
Redirector Web Part Example
A couple of clients that I have worked with have asked about client redirection within MOSS 2007 and WSS v3. What I mean by redirection is the ability to somehow redirect a user when they try to access a specific site. For example in most SharePoint projects you will be phasing in certain departments, however you are probably not going to build a department from scratch when they are ready. On one project the taxonomy structure was pre-defined and scripted using VBS and a large CSV file. This enabled us to deploy the complete taxonomy very quickly and without any user interaction, it also setup the relative security groups and links for that site. This is a great approach but means that unless you then modify the security and block the users out or use something like the redirect page in MOSS 2007 (if you are using MOSS that is) or you use ISA Server 2006 to do the redirection you cannot stop the users from playing with their area until they have been issued with it. That was one element of URL redirection, the other was for a customer that has a very simple "Selling" and "Wanted" section for their employees, however this became very popular and it ended up being one of the most hit sites in the system. The decision was made to restrict access to this site during certain hours of the day, so the question came, how can we do this in SharePoint?
So after some quick and dirty code I decided on the following approach, create a custom web part that can be added to a site and simply allow the "System Administrator" to set the allowable times and days that the site will show, then hey presto. This sounds very simple but actually became a little more taxing. If you think how many different links you have within a SharePoint site, you realize that if you are good SharePoint user you will probably have memorised the actual URL that you need. (Geeks!! Myself included).
Anyway I looked into this and decided that for this basic example simple homepage redirection would suffice and I would look at more scalable solution, possibly using HTTP Modules etc.
So the web part I am working on is very simple. Firstly add the web part to the relative page as shown below:

When the web part is added to the page simply choose to open the tool pane.


Once you have selected to enable the redirection, you can then type the URL to the redirection page that you wish to load in its place. Mine is a custom page that is stored within the 12 Hive.
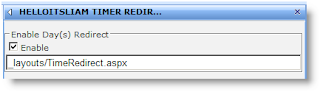
You will also see that a panel with all the days of the week becomes visible.

When a day is selected you are then asked to specify a time range that you wish the site to be available.
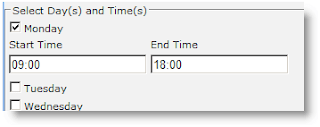
The above shows that we have set it so the site is available from 9am to 6pm. The current time on my Virtual Machine is:
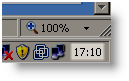
This means that in design mode the web part shows the following:

In the live rendered view it does not show anything on the page at all, completely hidden to the user. Now if I change the time to let's say 17:00, this should then block me accessing the site.

The custom page should then be rendered as shown below, in my page I am passing some values to the page so the user can see that yes it is an "Access Denied" and what the allowable hours are:

This is just the first version of my solution, the idea is to have a HTTP Module and some custom administration pages that allow for the dates and times to be set. The next incarnation of this will be the following:
So after some quick and dirty code I decided on the following approach, create a custom web part that can be added to a site and simply allow the "System Administrator" to set the allowable times and days that the site will show, then hey presto. This sounds very simple but actually became a little more taxing. If you think how many different links you have within a SharePoint site, you realize that if you are good SharePoint user you will probably have memorised the actual URL that you need. (Geeks!! Myself included).
Anyway I looked into this and decided that for this basic example simple homepage redirection would suffice and I would look at more scalable solution, possibly using HTTP Modules etc.
So the web part I am working on is very simple. Firstly add the web part to the relative page as shown below:

When the web part is added to the page simply choose to open the tool pane.

Next we need to enable the redirection function, be selecting the checkbox.

Once you have selected to enable the redirection, you can then type the URL to the redirection page that you wish to load in its place. Mine is a custom page that is stored within the 12 Hive.

You will also see that a panel with all the days of the week becomes visible.

When a day is selected you are then asked to specify a time range that you wish the site to be available.

The above shows that we have set it so the site is available from 9am to 6pm. The current time on my Virtual Machine is:

This means that in design mode the web part shows the following:

In the live rendered view it does not show anything on the page at all, completely hidden to the user. Now if I change the time to let's say 17:00, this should then block me accessing the site.

The custom page should then be rendered as shown below, in my page I am passing some values to the page so the user can see that yes it is an "Access Denied" and what the allowable hours are:

This is just the first version of my solution, the idea is to have a HTTP Module and some custom administration pages that allow for the dates and times to be set. The next incarnation of this will be the following:
- HTTP Module
- HTTP Redirection Feature
- Redirection Administration Pages
- Allow for Date Range Redirection
- Multiple Day Redirection based on Date range
- Multiple Time Redirection (Currently One Time Range Only)
This is just an idea of where things could go.
Manage Hierarchical data in SharePoint lists - Building a Project Team site template
Came across a really interesting and a very viable post here:
http://weblogs.asp.net/sharadkumar/archive/2008/07/13/manage-hierarchical-data-in-sharepoint-lists-building-a-project-team-site-template.aspx
http://weblogs.asp.net/sharadkumar/archive/2008/07/13/manage-hierarchical-data-in-sharepoint-lists-building-a-project-team-site-template.aspx
Subscribe to:
Posts (Atom)