Today I got asked how to modify the search box on a MOSS site so that it displayed "People" by default in stead of "All Sites". The customer already figured out a way to do this with code, but they weren't 100% sure about it. I had to search for this myself too, cause to be honest, I hadn't done this before, even though I'm already working with SharePoint for almost 3 years now... That's why I'm making this short post, so that all the other people who are trying to do this, know how easy it really is.
To modify the default scope, go to your home page and navigate to "Site Actions” --> “Site Settings” --> “Modify All Site Settings". On this page, pick "Search scopes" under the Site Collection Administration. Here you'll see some different "Display groups", one of them is the "Search Dropdown", which is the search box you see on your SharePoint site. If you click on the "Search Dropdown" link, you'll be taken to a page with some settings for this group and the bottom one is where you set your default scope. So modify this to whatever you want, click OK and you're done!
Thursday, December 31, 2009
Workflow fails to start when associated to a survey list in WSS 3.0
The status of a workflow appears as "Failed to Start" when you try to start a workflow from a survey response in Windows SharePoint Services 3.0
Refer this knowledge base article. It seems to be a known issue at MS - http://support.microsoft.com/kb/926370
How to edit list forms like NewForm.aspx, EditForm.aspx and DispForm.aspx in MOSS?
Most common question among SharePoint customization is that
If we need to edit New/Edit/Display Form of list most of the time we are using SharePoint designer.
But here is the one nice trick to achieve this functionality.
Just add “&ToolPaneView=2” at the end of the URL and refresh the page.
So that you’re URL will be like this.
You can see add webpart tool pan beside this web part.
And that will take you to this type of page.
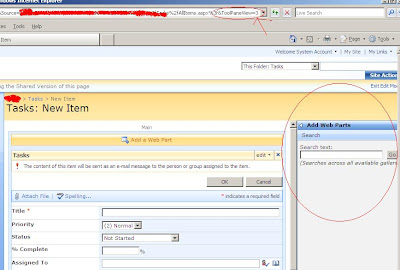
This will allow you to search webpart across all available galleries
Cheers once again...
“Why Edit Page option is not available in list forms like NewForm.aspx, EditForm.aspx and DispForm.aspx?”
If we need to edit New/Edit/Display Form of list most of the time we are using SharePoint designer.
But here is the one nice trick to achieve this functionality.
Just add “&ToolPaneView=2” at the end of the URL and refresh the page.
So that you’re URL will be like this.
http://yourMOSSserver/... /Lists/Demo/NewForm.aspx?RootFolder...&Source=…&ToolPaneView=2
http://yourMOSSserver/... /Lists/Demo/EditForm.aspx?RootFolder...&Source=…&ToolPaneView=2
http://yourMOSSserver/... /Lists/Demo/DispForm.aspx?RootFolder...&Source=…&ToolPaneView=2
You can see add webpart tool pan beside this web part.
Just add or remove your webpart and your work is done.
cheers
Below contents are Update as on 22/07/08
There is one more parameter with the same name just pass the value 3 with that.
So that you’re URL will be like this.
http://yourMOSSserver/... /Lists/Demo/NewForm.aspx?RootFolder...&Source=…&ToolPaneView=3
And that will take you to this type of page.

This will allow you to search webpart across all available galleries
Cheers once again...
Wednesday, December 30, 2009
Limiting the number of survey responses
Hi All,
In this article, I am going to share one very important aspect of survey. Many times we require limiting number of responses from survey. However SharePoint does not provide us with the facility to limit the number of responses.
Ok, then how to achieve this? Here we go, follow these simple steps and you are good to go.
(1) Write one web part and write one code which checks for the total responses for specific survey. Add this web part on NewForm.aspx and overview.aspx, all responses and graphical summary of the survey. You get NewForm.aspx when you click on respond to the survey button.
(2) Write down simple code, check URL, if NewForm word exist, then just count the total number of item in survey and if it exceeds let’s say 30 responses, and then redirect back to Source parameter.
(3) If in URL overview, allitems or summary exist, just count the total number of item in survey and if it exceeds let’s say 30 responses then write a statement saying you are not allowed to respond because it has already reached to the maximum responses.
Your job is done.
Time Spanning the "!New" Indicator in Sharepoint 2007
Here we are explaining a way, how to change “!New” indicator time span.
Below is the command to change the time of “!New” label of SharePoint Item
stsadm.exe -o setproperty -pn days-to-show-new-icon -pv <> -url [Your Virtual Server's URL]
To turn off the “!New” icon, set the number of days to zero
Here is the MSDN KB link for the same.
The change is for ALL list items (not just documents) on the virtual server
Good thing is it does not required IISRESET
Coloring Events on a Sharepoint Calendar
Hi All,
We all are familiar with coloring events in Outlook calendar. Question is can we have the same deal with SharePoint calendar and the answer is yes we can have. In this article, I am going to share few tips on how to achieve this functionality.
To achieve this, first create one field in Calendar list. For example, give it a name “Category”. Your each event is divided in some category. Give it as choice column and enter following categories for selection choice.
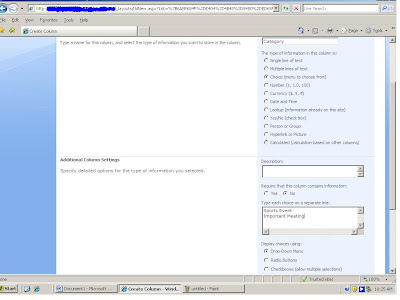
So, your each event is divided in these two categories. So now, go ahead and add two entries in calendar. One of Sports and other is of important meeting category.
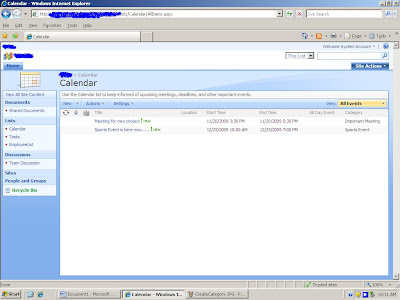
Also create one more calculated column called “CatTitle”
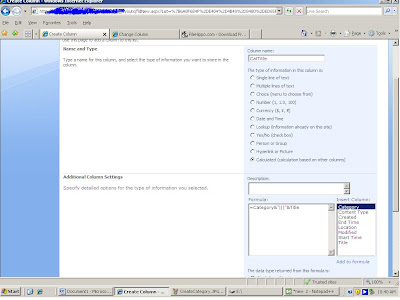
And change the calendar view to this
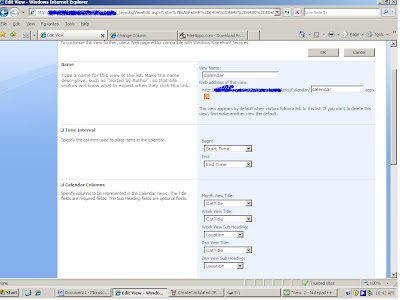
And now we will add one content editor web part below calendar web part. So Edit the page and add one content editor web part and add the following line of code. This will color the different events.
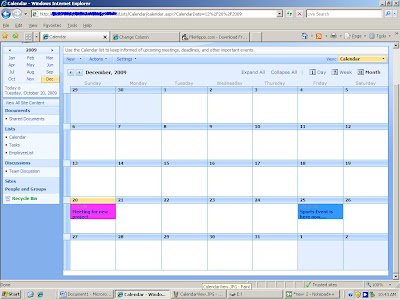
I would like to thank Mark Wilson for this wonderful trick.
That's it. your job is done.
We all are familiar with coloring events in Outlook calendar. Question is can we have the same deal with SharePoint calendar and the answer is yes we can have. In this article, I am going to share few tips on how to achieve this functionality.
To achieve this, first create one field in Calendar list. For example, give it a name “Category”. Your each event is divided in some category. Give it as choice column and enter following categories for selection choice.

So, your each event is divided in these two categories. So now, go ahead and add two entries in calendar. One of Sports and other is of important meeting category.

Also create one more calculated column called “CatTitle”

And change the calendar view to this

And now we will add one content editor web part below calendar web part. So Edit the page and add one content editor web part and add the following line of code. This will color the different events.

I would like to thank Mark Wilson for this wonderful trick.
That's it. your job is done.
Thursday, December 3, 2009
Windows SharePoint Services (WSS 3.0) Search Error Fix
Event Type: Warning
Event Source: Windows SharePoint Services 3 Search
Event Category: Gatherer
Event ID: 2436
Date: 2/25/2009 Time: 12:35:04 PM
User: N/AComputer: YOURMOSSSERVER
Description:
The start address cannot be crawled.
Context: Application 'Search index file on the search server', Catalog 'Search'
Details: Access is denied. Check that the Default Content Access Account has access to this content, or add a crawl rule to crawl this content. (0x80041205)
For more information, see Help and Support Center at http://go.microsoft.com/fwlink/events.asp.
Resolution:
Follow these steps to Disable the loopback check which is causing the error:
Click Start, click Run, type regedit, and then click OK. In Registry Editor, locate and then click the following registry key: HKEY_LOCAL_MACHINE\SYSTEM\CurrentControlSet\Control\Lsa
Right-click Lsa, point to New, and then click DWORD Value. Type DisableLoopbackCheck, and then press ENTER.
Right-click DisableLoopbackCheck, and then click Modify.
In the Value data box, type 1, and then click OK.
Quit Registry Editor, and then restart your computer.
See the following knowledge base article from Microsoft for full details on the error and another possible resolution: http://support.microsoft.com/kb/896861
SharePoint V3: Stsadm.exe Simple Backup Script
Create Backups Directory
Create a backup directory for storing the scheduled SharePoint backups (e.g. c:\backupsharepoint)
Create Bat File Directory
Create a directory for storing the backup script file (e.g. c:\scriptssharepoint)
Create Bat File
Create a bat file using the code below, modified for your environment. Use UNC paths when using in a server farm environment.
@echo offecho ====================================================
echo Backup Script For Office SharePoint Server 2007
echo ====================================================
cd \program files\common files\microsoft shared\web server extensions\12\bin
@echo off
stsadm.exe -o backup -url http://servername/ -filename c:\backupssharepoint\backupsharepoint.dat -overwrite
@echo off
echo completed
Schedule bat fileSchedule the backup to run frequently, during off peak hours.
Open Start > Programs > Accessories > System Tools > Scheduled TasksAdd a Scheduled Task
Scheduled Task Welcome Screen, Click NextClick the program you want Windows to run, Click Browse
Select the backupsharepoint.bat file you created (e.g. c:\scriptssharepoint\backupsharepoint.bat)
Name the task, Schedule it (e.g. Daily)
Start Time, Frequency, Start Date
Username and Password (use a domain user account that has proper permissions and non expiring password )
Finish
Verify Backups
Keep the backup directory secure. Monitor the job to ensure the job is running properly. Perform test restores from the backup files.
Subscribe to:
Comments (Atom)
